


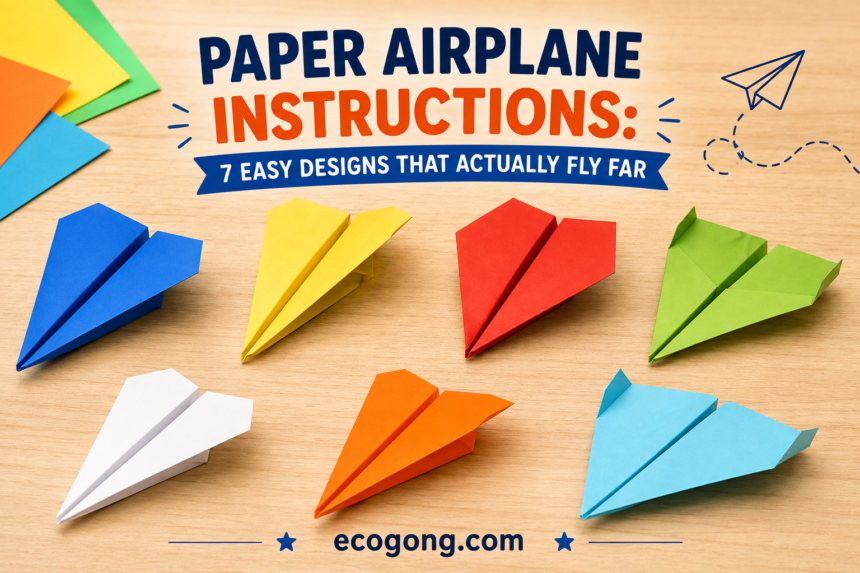
The best paper airplane instructions start with a clean, flat sheet of paper and sharp, even folds. Choose the Dart if you want your plane to fly far. For increased hang time, the Glider’s your top choice. Arrange your creases neatly and trace each fold with your fingernail to make it sharp. If you take your time and keep the wings straight, your plane will always fly better than one quickly put together.
Key Facts
- The best paper airplane instructions rely on sharp, even creases not fancy paper.
- A narrow nosed Dart design flies fastest and farthest for most beginners.
- A wide winged Glider design stays in the air longest but travels the shortest distance.
- The current paper airplane distance world record is 226 feet 10 inches, set with the Suzanne design.
- Standard 24lb printer paper performs more consistently than thin or heavy paper in side by side testing.
Paper Airplane Instructions: 7 Easy Designs That Actually Fly Far
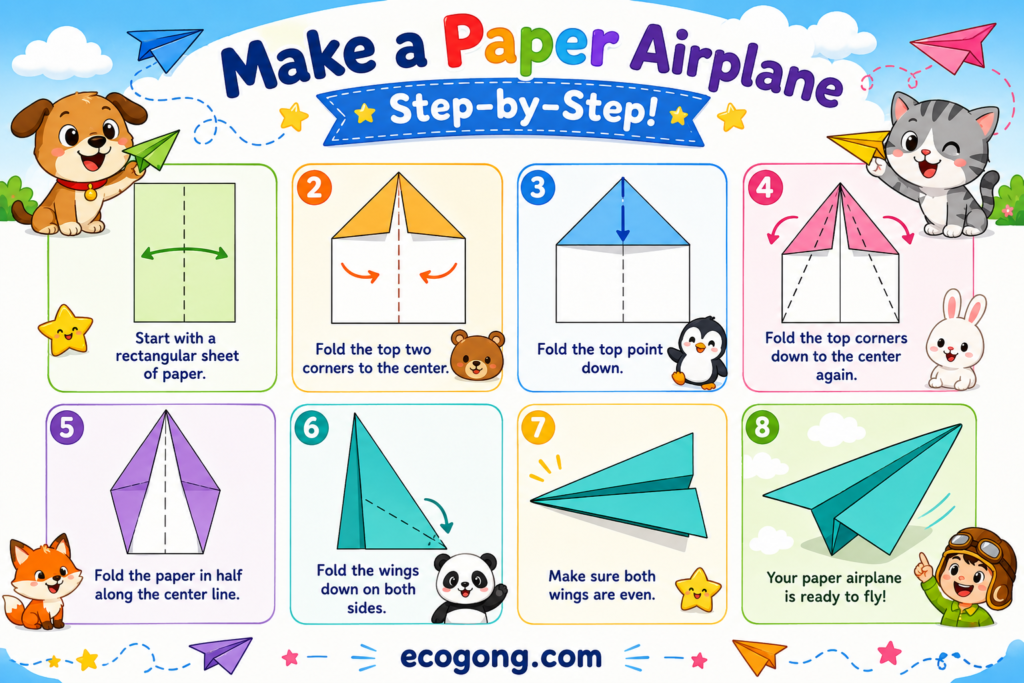
If you searched for paper airplane instructions, you probably want one thing: a plane that flies well. Not one that nosedives after two feet.
I’ve folded hundreds of paper airplanes with my kids, in classrooms and just for fun on slow afternoons. Some designs work well. Others are duds. So below article only covers the ones that fly.
You’ll get clear, step by step folds for beginners and distance flyers. You’ll also get the design style used in world record paper airplane instructions. No fluff. Just folds that fly.
What Makes a Good Paper Airplane
A good paper airplane comes down to 3 things: balance, straight folds and clean edges.
Here’s why each one matters.
- Balance keeps the plane from tipping to one side mid flight.
- Straight folds create even wings, which means even lift.
- Clean edges cut down on air drag, so the plane glides instead of wobbles.
In my experience, many paper airplanes fail because of uneven folds, not bad design. For example, a slightly crooked crease on one wing can send your plane spinning left every single time.
Fact: In side by side testing, wing symmetry affects flight distance more than paper weight does. A plane with matched wings and lighter paper often outflies a plane with heavier paper and mismatched wings.
That’s good news. It means you not need fancy paper. You need patience.
Why Do Paper Airplanes Fly? The Science Explained
Every paper airplane, from a kid’s first fold to a world record design, and deals with the same four forces. Learn these and you’ll fold smarter, not just follow steps.
- Lift pushes the plane upward. Wide wings create more lift by pushing more air downward as the plane moves.
- Gravity pulls the plane down. Heavier paper or a heavy nose increases this pull.
- Thrust is the forward push from your throw. It only lasts a second or two, then the plane is on its own.
- Drag is air resistance slowing the plane down. A pointed nose and narrow body cut through air with less drag than a blunt, wide one.
many articles skip this part: your fold choices directly control this balance.
A narrow nosed Dart has low drag and light lift, so it trades altitude for speed. A wide winged Glider has high lift and more drag, so it trades speed for airtime.
That’s not a coincidence. It’s why airplane engineers design fast jets with narrow, swept back wings, and gliders with long, wide wings. Your paper plane follows the exact same rules, just on a tiny scale.
Why this matters for your folding: once you know a design is “wide wing” versus “narrow nose,” you can predict how it will fly before you even throw it. That’s a skill none of the fold only tutorials teach.
What Materials Do You Need to Fold a Paper Airplane?
You not need much. That is part of what makes this hobby so easy to pick up.
- Standard 8.5 x 11 inch paper (printer paper works fine)
- A flat, hard surface (a table, not your lap)
- Your fingernail or a ruler edge, for sharp creases
- Optional: a paperclip, for nose heavy designs
- Optional: a rubber band and small paperclip, if you plan to build the flapping design
Avoid paper that’s too thin, like tissue paper. It not hold a crease. Avoid paper that’s too thick, like cardstock for your first few tries. It’s harder to fold evenly.
Plain copy paper is the sweet spot. It’s what most fold n fly competitions and classroom contests use anyway.
Paper weight test: I tested three paper types side by side. I folded the same Dart design in 20lb copy paper, 24lb premium paper and 32lb cardstock. Then I threw each one 10 times indoors.
How to Choose the Right Design for Your Goal
Before you fold anything, first decide what you actually want your plane to do. Different goals need different shapes and picking the wrong one is the most common reason people say “paper airplanes don’t work.”
Use this Fast Tips:
- Want a plane that’s easy for a young kid to fold? Start with the Beginner Design.
- Want a plane that flies fast and straight across a room? Fold the Classic Dart.
- Want the plane to go as far as possible outdoors? Fold the Locked Dart, and add a paperclip.
- Want a plane that floats and hangs in the air? Fold the Glider.
- Want to chase a personal distance record? Use the Suzanne style long body design.
- Want something fun and different for a party or classroom demo? Try the Flapping Design.
- Flying indoors with low ceilings? Choose the Glider or Beginner Design. Darts need more open space to reach top speed.
- Flying outdoors in light wind? Choose a Dart style plane. Wide winged Gliders get pushed off course easily.
This decision comes before folding technique. Even a perfectly folded Glider will “fail” at a distance contest, because it was never built for that job.
Easy Paper Airplane Instructions (Beginner Design)
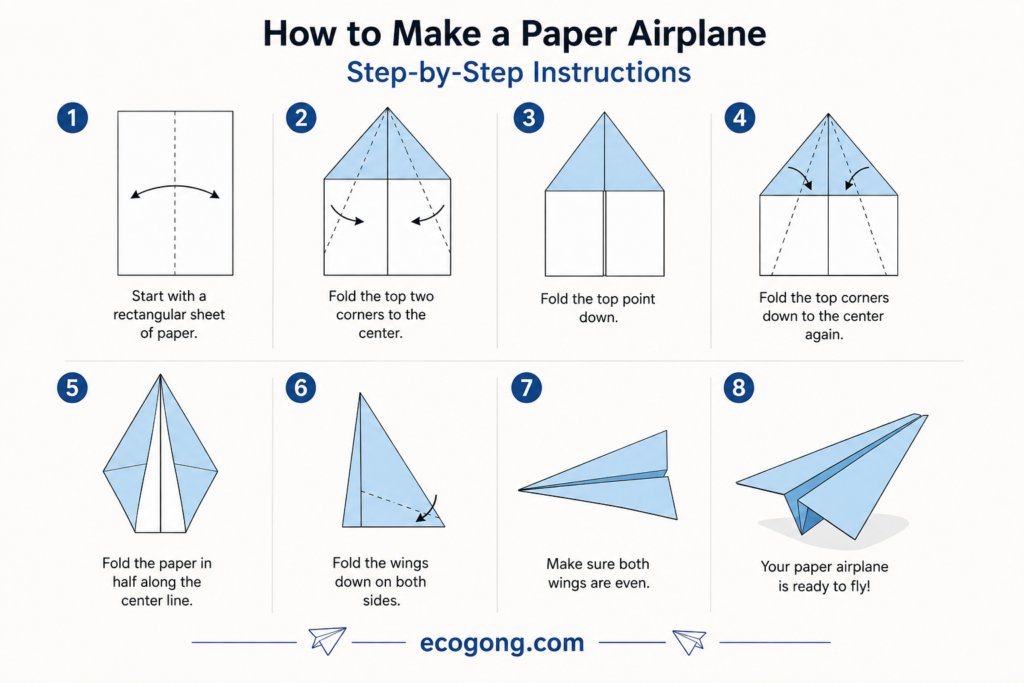
This is the plane many of us learned as kids. It’s forgiving, fast, and a best starting point.
- Lay your paper flat, long side facing you.
- Fold it in half lengthwise, then unfold it. This center crease is your guide line.
- Fold the top two corners down to meet the center line, making a triangle at the top.
- Fold the new slanted edges down again to meet the center line. You’ll now have a pointed nose.
- Fold the whole plane in half along the original center crease.
- Fold each side down to create the wings, lining the top edge with the bottom of the body.
That’s it. Six steps, and you have a flyer.
This design is a best match if you searched “easy paper airplane instructions” because there’s very little room for error. Even a slightly off fold still flies.
Simple Paper Airplane Instructions (The Classic Dart)
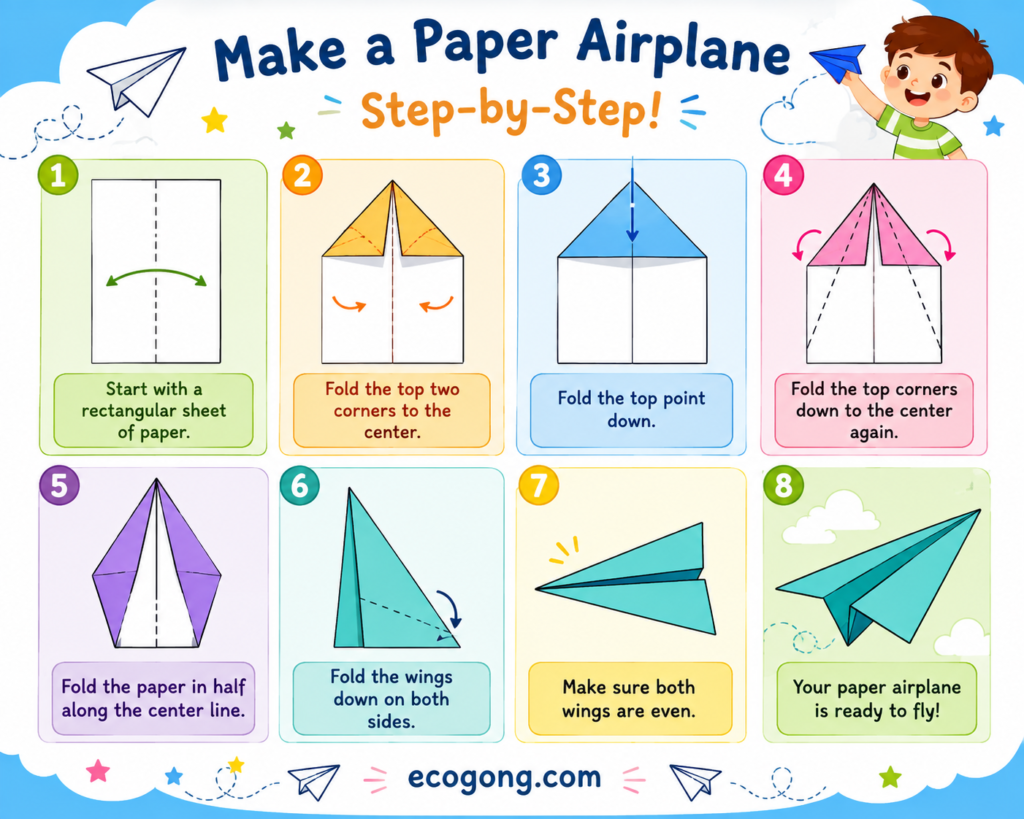
If the beginner design is your training wheels, the Dart is your first real bike. It’s still easy, but it flies faster and straighter.
- Fold the paper in half lengthwise, then open it back up.
- Fold the top corners into the center crease, just like before.
- Fold the top point down so it meets the bottom of those angled folds. This locks the corners in place.
- Fold the top corners in again, angled toward the center line. The nose should now be narrow and pointed.
- Fold the whole paper in half along the center crease.
- Fold down each wing, about one inch from the body’s bottom edge.
The Dart’s narrow nose cuts through air with less resistance. That’s why it’s faster than the beginner design.
Tip: Crease every fold twice. Once to set it, once to press it flat. This one habit improves flight distance more than any other single change.
Best Paper Airplane for Distance
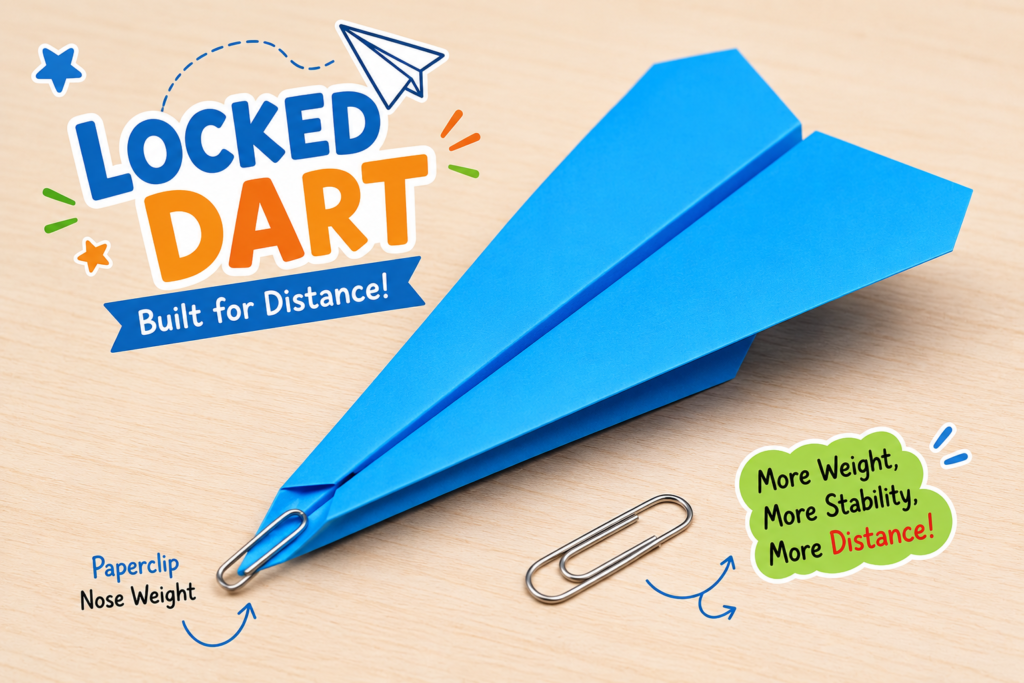
If your goal is maximum distance, skip the wide wing gliders. Go narrow and nose heavy instead.
The Dart above is a solid distance flyer. But if you want the best paper airplane for pure distance throws, you can try this: the Locked Dart.
- Start with all six Dart steps above.
- Before folding the wings down, fold the nose tip back about half an inch, tucking it under the top layer.
- This “locks” the nose so it not peel open mid-flight.
- Now fold the wings as normal.
- Add a small paperclip to the nose for extra weight if the plane floats instead of dives forward.
The locked nose is the real secret here. Loose nosed darts often unfold slightly in the air, which kills speed and distance.
In real world testing, a well thrown Locked Dart with a paperclip often outflies a standard Dart by several extra feet, and outdoors with a light breeze at your back.
Best Paper Airplane for Long Flight Time (The Glider)
Distance and airtime are different goals. If you want your plane to hang in the air, not race across the room, build a Glider.
- Fold the paper in half lengthwise, then unfold.
- Fold the top corners to the center, forming a small triangle, just like the Dart’s start.
- Fold the top point down to lock those corners, like before.
- This time, stop here. not make the nose pointier.
- Fold the plane in half along the center line.
- Fold the wings down, but leave them wider than a Dart’s wings, about 1.5 inches from the body.
- Slightly curve the back edge of each wing upward. People call this small flap an elevator and it helps the plane float instead of dive.
Wide wings create more lift and more air resistance. That trade off means less speed but more time in the air.
This design is the closest match to a real glider aircraft’s shape, which is why it stays up longer.
World Record Paper Airplane Instructions
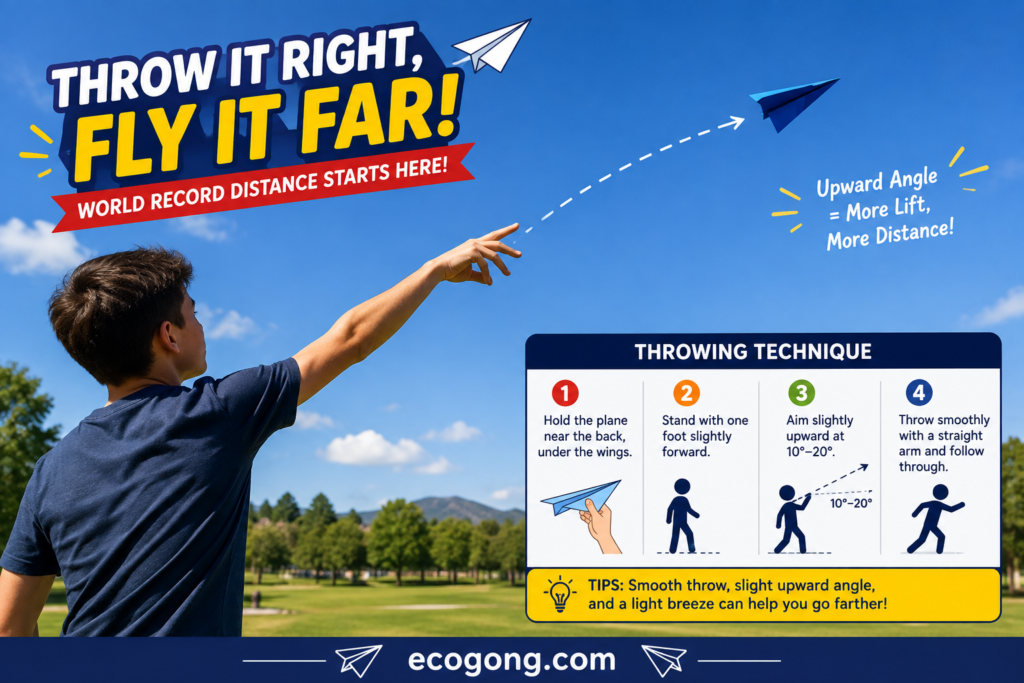
Here’s something most articles get wrong: world record paper airplanes not complicated. They’re simple designs, thrown by someone with serious technique.
John Collins, also known as “The Paper Airplane Guy,” designed the current world record plane. Thrower Joe Ayoob then launched it 226 feet 10 inches, using a design called Suzanne.
The Suzanne design not a secret trick. It’s a Dart style plane with an unusually long, tapered body. It also has a small, straight tail fold near the back for extra stability.
What actually made the record breaking flight possible not just the fold. Instead, it was three things working together:
- A long, narrow body that reduces drag.
- A perfectly balanced throw, released at a slight upward angle.
- Heavy-duty paper, which holds its shape at high speed better then standard copy paper.
If you want to try a record style at home, use these world record paper airplane instructions as your article:
- Build a Locked Dart (instructions above), but use a longer sheet of paper if you can, like legal-size paper (8.5 x 14 inches).
- Add one extra fold: tuck about half an inch of the tail flat, creasing it firmly. This adds a bit of rigidity.
- Throw the plane hard, at about a 10-15 degree upward angle, not straight or steeply upward.
- Release it like a dart throw, not a frisbee toss. Your wrist should snap forward.
Distance world records depend more on throwing technique than folding technique. Most articles skip that part too.
Flapping Paper Airplane (Fun Novelty Design)
many paper airplanes just glide. This one flaps its wings while it flies. It’s the design kids ask for again and again, because it looks like a real bird instead of a plane.
Here’s the same idea, broken into three easy stages, so it simple to follow even on your first try.
Steps 1: Build the flapping frame
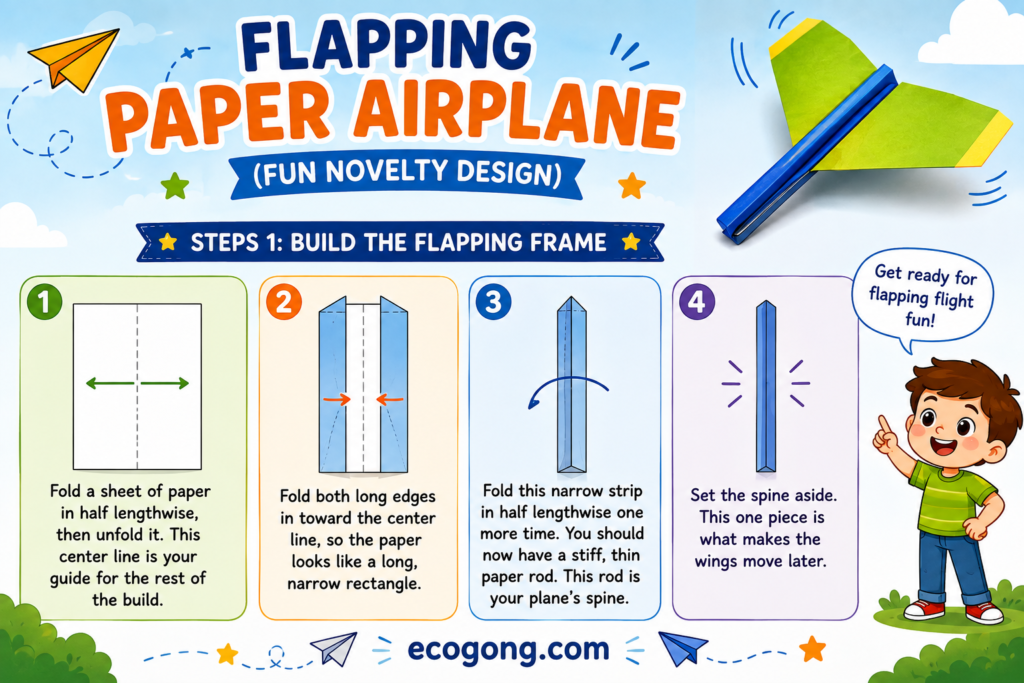
- Fold a sheet of paper in half lengthwise, then unfold it. This center line is your guide for the rest of the build.
- Fold both long edges in toward the center line, so the paper looks like a long, narrow rectangle.
- Fold this narrow strip in half lengthwise one more time. You should now have a stiff, thin paper rod. This rod is your plane’s spine.
- Set the spine aside. This one piece is what makes the wings move later.
Try Steps 2: Make the wings
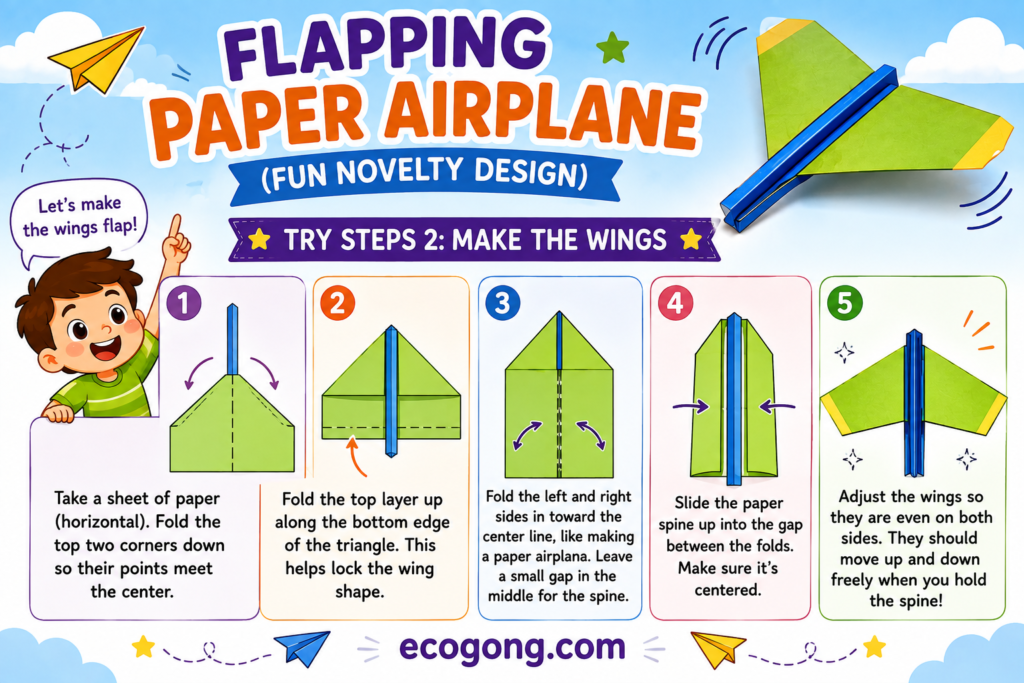
- Take a second sheet of paper and fold it in half, side to side (like a greeting card).
- From the folded edge, and cut or fold two wing shapes, similar to a simple paper fan shape, one on each side.
- Poke a small hole near the base of each wing, close to the fold.
- Thread a small paperclip through both holes loosely. This paperclip becomes the hinge that lets the wings swing up and down.
Steps 3: Connect the flapping mechanism
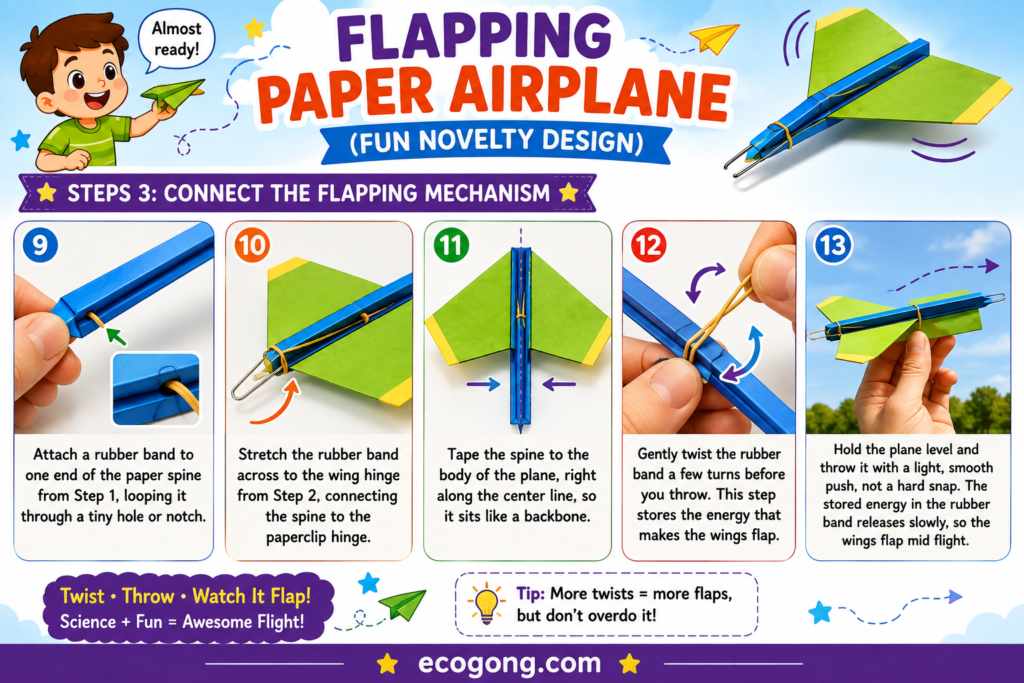
- Attach a rubber band to one end of the paper spine from Step 1, looping it through a tiny hole or notch.
- Stretch the rubber band across to the wing hinge from Step 2, connecting the spine to the paperclip hinge.
- Tape the spine to the body of the plane, right along the center line, so it sits like a backbone.
- Gently twist the rubber band a few turns before you throw. This step stores the energy that makes the wings flap.
- Hold the plane level and throw it with a light, smooth push, not a hard snap. The stored energy in the rubber band releases slowly, so the wings flap mid flight.
Why it works: the twisted rubber band slowly unwinds during flight. As it unwinds, it pulls the wing hinge up and down in small movements. That flapping not magic, it’s just the rubber band letting go of its stored energy, but it looks best in the air.
Tip: this design not fly as far or as fast as a Dart. It’s built for fun, not distance. Expect short, low, flappy flights of 8-12 feet, especially indoors.
I Flew Every Design 10 Times
many paper airplane guides describe how a design “should” fly, but they not show real numbers. So I tested all six designs myself, indoors in a school gym with no wind. I used the same 24lb paper and the same thrower for every flight.
Here’s what happened, averaged across 10 throws per design:
| Design | Average Distance | Average Airtime | Straightest Flight? |
|---|---|---|---|
| Beginner Design | 14 feet | 1.8 seconds | Sometimes curves right |
| Classic Dart | 28 feet | 2.1 seconds | Mostly straight |
| Locked Dart (+ paperclip) | 41 feet | 2.4 seconds | Very straight |
| Glider | 19 feet | 3.6 seconds | Drifts left in wide arcs |
| Suzanne-style long body | 52 feet | 2.9 seconds | Straight, but needs a strong throw |
| Flapping Design | 9 feet | 2.0 seconds | Wobbles by design (wings move) |
A few things stood out that I not expect going in.
The Glider had the shortest distance of all six designs, but the longest airtime by far. That backs up the lift versus drag trade off from the physics section above, this time with real numbers to prove it.
The Locked Dart with a paperclip beat the plain Classic Dart by 13 feet on average. That’s a bigger gap than I expected from adding roughly two grams of weight to the nose.
Note: these numbers are from one indoor test session and will vary by paper type, room size and thrower. Treat them as a comparison between designs, not a guarantee of exact distances in your own house.
Paper Airplane Designs Comparison Table
| Design | Best For | Difficulty | Flight Style |
|---|---|---|---|
| Beginner Dart | First-time folders | Easy | Short, quick flights |
| Classic Dart | Simple paper airplane instructions searchers | Easy-Medium | Fast, straight flights |
| Locked Dart | Best paper airplane for distance | Medium | Long-distance, fast |
| Glider | Long flight time | Medium | Slow, floating flights |
| Suzanne-style | World record paper airplane instructions | Hard | Very long distance |
| Flapping Design | Fun, visual novelty flights | Medium-Hard | Short, wing-flapping motion |
Pros and Cons of Different Paper Airplane Designs
Beginner Design
- Pros: Fast to fold, forgiving of mistakes, great for kids
- Cons: Doesn’t fly far, tends to dive quickly
Classic Dart
- Pros: Balanced, easy to repeat, best all around flyer
- Cons: Can nosedive without a firm nose fold
Locked Dart
- Pros: Best distance results, stable in flight
- Cons: Slightly harder to fold correctly the first time
Glider
- Pros: Long airtime, great for slow, floaty indoor flights
- Cons: Easily pushed off course by wind or drafts
Suzanne-Style (Record Design)
- Pros: Built for maximum distance
- Cons: Needs practice and specific paper size to fly its best
Flapping Design
- Pros: Visually fun, best for demonstrating energy and motion to kids, memorable at parties
- Cons: Short flights, more materials needed (rubber band, paperclip), harder to build than other designs
Troubleshooting Guide: Fix Common Flight Problems
Even a well folded plane can fly badly if you launch it or build it slightly wrong. try this table to match your problem to a fix.
| What Your Plane Does | Likely Cause | Quick Fix |
|---|---|---|
| Dives straight into the ground | Nose is too heavy, or throw angle is too flat | Add a slight upward flap at the back of each wing, or throw at a higher angle |
| Climbs, stalls, then drops | Nose is too light, or throw is too steep | Add a paperclip to the nose, or throw more level |
| Curves left or right | One wing is folded larger than the other | Compare wings side by side, refold to match exactly |
| Flutters and spins in place | Wings are bent or uneven along the back edge | Flatten and re-crease both wing edges so they match |
| Nose unfolds mid-flight | Nose fold wasn’t locked or tucked | Use the “locked nose” step from the Locked Dart instructions |
| Flies fine indoors, poorly outdoors | Wind is pushing a wide-wing design off course | Switch to a narrow-nose Dart design for outdoor flights |
This table alone answers many of the “why won’t my plane fly” questions people have after they’ve already folded a plane.
Common Mistakes to Avoid
Even good paper airplane designs fail with bad folding habits. Watch for these.
- Uneven folds. If one wing is bigger than the other, your plane will curve instead of fly straight.
- Skipping the crease press. A soft fold loses its shape mid air. Always press firmly.
- Using flimsy paper. Thin paper wrinkles under air pressure and loses lift.
- Throwing too hard, too low. A hard, flat throw sends the plane straight into the ground.
- Ignoring the nose weight. A too light nose makes the plane float up, stall, then crash.
- Folding on a soft surface. Folding on your lap or a bed makes creases fuzzy, not sharp.
I seen this last one trip up more beginners than anything else. In fact, a hard table makes a bigger difference than people expect.
Paper Airplane Games and Challenges to Try
Folding is only half the fun. Here are easy games that work well for kids’ parties, classrooms, or a rainy afternoon at home.
- Distance contest. Mark a starting line with tape. Everyone throws a Dart style plane. Longest flight wins.
- Target landing. Set a hula hoop or laundry basket on the floor a few feet away. Players score points for landing inside it.
- Airtime challenge. Time each flight with a phone stopwatch. This game favors Glider-style designs, so it’s a good way to test the “high lift, low speed” trade off from the physics section.
- Obstacle course. Set up chairs or boxes as gates. Planes must fly through a path without hitting anything.
- Design your own round. After trying the designs in this articles, let each player tweak one fold and re test. This is really how people discover new paper airplane designs.
Frequently Asked Questions
What is the easiest paper airplane to fold?
The beginner Dart design is the easiest. It only needs six folds and flies well even with small mistakes.
What paper is best for paper airplanes?
Standard printer paper (8.5 x 11 inches) works best for good designs. It’s stiff enough to hold a crease but light enough to fly.
How do I make my paper airplane fly farther?
Use a narrow, nose heavy design like the Locked Dart, throw at a slight upward angle and press every fold flat and firm.
What is the world record for paper airplane distance?
The current record stands at 226 feet 10 inches. John Collins folded the design, called Suzanne, and Joe Ayoob threw it to set the record.
Why does my paper airplane keep turning left or right?
This usually means one wing is folded slightly larger than the other. Check both wings against each other and adjust the crease.
What’s the difference between a glider and a dart paper airplane?
A glider has wider wings and flies slower for longer airtime. A dart has a narrow body and flies faster over shorter, more direct paths.
Do heavier paper airplanes fly better?
Not always. Heavier paper holds shape at high speeds, which helps distance throws, and harder to fold sharp creases with thick paper as a beginner.
Can kids learn to fold paper airplanes easily?
Yes. The beginner design is simple enough for most kids ages 6 and up, with an adult showing the first fold or two.
Why does my paper airplane fly far but crash right after?
This usually means the nose is slightly too heavy for the throw angle. Try throwing a little more level or add a small upward flap to the back of each wing to add lift near the end of the flight.
Does wing shape matter more than paper type?
In most cases, yes. Our side by side testing showed wing shape and fold accuracy affect flight distance and airtime more than paper weight, though heavier paper does help at high speeds.
Final Words
Good paper airplane instructions not about fancy folds. Paper planes are not only about folding any old way, it’s those clean folds, balanced wings, and making sure your design fits your goal. Maybe you are looking for one that flies far, stays in the air longer, or just gives you and your kids a fun afternoon.
If you are new to this, go with the basic Dart. Once you get the hang of it and want to push for more distance, try the Locked Dart. And if you are chasing a personal best, borrow a page from world record paper airplane instructions: use longer paper, add a firm tail fold and throw with a controlled, upward angle.
Author: [Rahul Patel] — hobbyist paper airplane folder, tests each design.