


Quick Answer
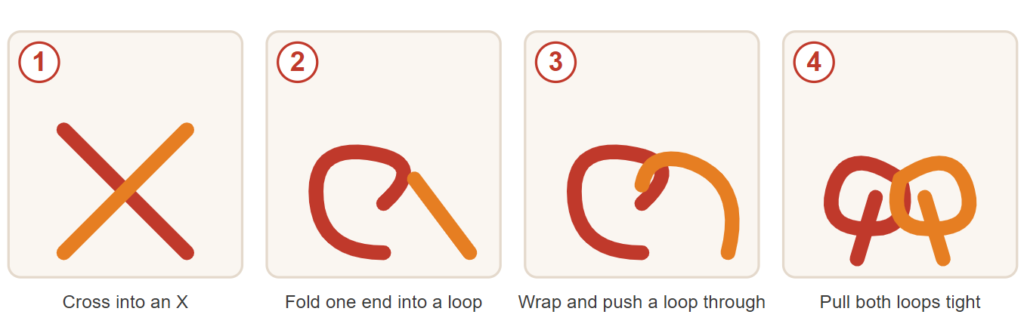
Here, simple Cross the ribbon into an X. and Fold one end into a loop. Wrap the other end around it, push a small loop through the gap and pull both sides tight. It is the same motion as tying a shoelace. many people go wrong in two places: they cut the wrong length of ribbon or they pull tight before checking that both loops match.
How to Tie a Bow With Ribbon: The Complete Guide (With Troubleshooting)
Now, we are used to think I was just bad at tying bows. Many gift I wrapped looked like the ribbon had lost a fight.
Also Turns out my hands were fine. Nobody had ever told me how much ribbon to cut, or that satin behaves nothing like wired ribbon.
check I figured out those two things, everything clicked. also below guide covers the parts most tutorials skip: measuring, picking the right ribbon, and fixing a bow that is gone wrong.
Why Most Bows Fail (It is Not Your Fingers)
Here is something most article not tell you. A bad bow rarely comes down to clumsy hands. check below some three things:
- Wrong ribbon length. Cut it too short and you not make even loops. Cut it too long and the bow flops.
- Wrong ribbon for the job. Thin satin just not hold a big, structured Christmas bow.
- Uneven tension. You pull one side tighter than the other before checking the loop sizes.
Now you can Fix these things first and Then the actual tying gets easy. So that is where we’ll start.
Example: On one occasion, I attempted to create a bow for a big gift basket using a leftover ribbon from a tiny candle box. There was not enough length of ribbon to create perfect loops, resulting in a very small and crooked bow compared to the large basket. However, once I switched to a longer piece, I was able to produce a bow that had the right dimensions.
How Much Ribbon You Actually Need
Many articles skips this step. That is why so many people run out of ribbon halfway through a bow, or end up with a giant bunch of extra fabric at the center.
Use below easy formula:
Ribbon length = (box width × 2) + (bow size × 6) + 12 inches for tails
Say you have a shoebox sized gift, about 8 inches wide, and you want a 6-inch bow:
- 8 × 2 = 16 inches to wrap around the box
- 6 × 6 = 36 inches for the loops
- Plus 12 inches for the tails
- Total: about 64 inches, or roughly 1.8 yards
You not need to hit this number exactly. Round up. Trimming extra ribbon later is easy. Running out mid-bow is not.
Quick reference by project:
| Project | Approximate Ribbon Needed |
|---|---|
| Small gift bow (jewelry box) | 20–24 inches |
| Medium gift bow (shoebox) | 36–48 inches |
| Large gift or basket bow | 48–60 inches |
| Full Christmas wreath bow | 5–8 feet |
| Hair bow or small craft bow | 12–18 inches |
Example: check easy like wrapping a bottle of wine as a gift? A bottle is roughly 3 inches wide. Plug that into the formula with a small 4-inch bow: (3 × 2) + (4 × 6) + 12 = 42 inches. That is just under 3.5 feet, enough for a neat bow at the neck of the bottle with a little to spare.
How to Tie a Bow With Ribbon (Step-by-Step)
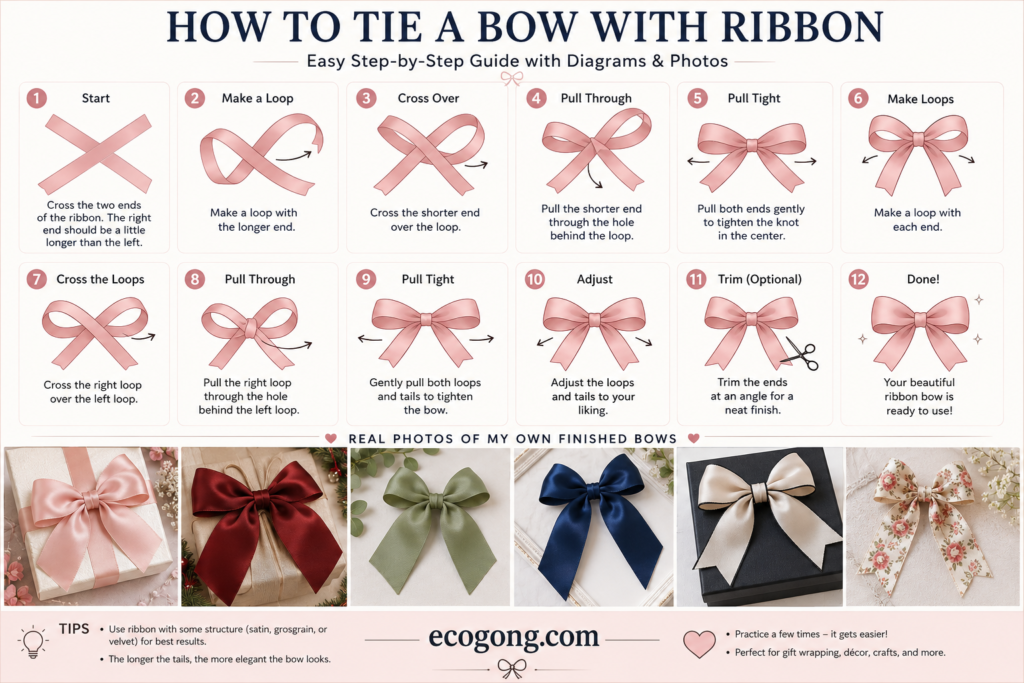
Check below some move to learn first. Every other style is just a variation on it.
- Cut your ribbon. Use the formula above, or start with 24 inches to practice.
- Cross the ribbon into an X shape. Think of the first step in tying a shoelace.
- Fold one end into a loop. Pinch it at the center with your thumb and finger.
- Wrap the second end around the loop. Bring it behind, then over the top.
- Push a small section through the gap behind the first loop.
- Pull both loops at the same time. Not one after the other. This keeps the bow from twisting as it tightens.
- Even out the loops so both sides match.
If you are left-handed: just mirror the whole motion. Pick whichever hand feels natural for holding the first loop, then keep that same hand doing the “holding” job all the way through. Switching hands halfway is what causes a lopsided bow.
Why This Method Works
This not a regular knot. It is slip knot. A slip knot holds under tension, but it comes apart cleanly when you pull one tail. and exactly why it is so easy to loosen, adjust, and retie if your first attempt looks off.
How to Tie a Ribbon Bow for Gifts
Now, gift bow has one job beyond looking nice: it needs to survive handling. Carrying, shipping, curious kids all of it.
- Wrap the ribbon around the box, and crossing it on top.
- Tie one overhand knot to anchor everything in place.
- Use the two loose ends to follow the basic bow steps above.
- Pull tight, then trim the ends at a 45-degree angle.
That angled cut not just for looks. It slows down fraying compared to a straight cut.
Bow-to-box size guide:
- Small gift (jewelry box): 4–6 inch bow
- Medium gift (shoebox): 6–8 inch bow
- Large gift or centerpiece: 8–12 inch bow
A bow is too big for the box tips over or hides the lid completely. Match the size and it reads as intentional instead of accidental.
Example: now a standard shoebox sized gift (about 12 x 8 inches) looks best with a 6 to 8 inch bow sitting slightly off center toward one edge, than dead center. It is small detail, but is the kind of thing gift shops do that makes wrapping look more polished.
How to Tie a Christmas Bow (Full and Fluffy)
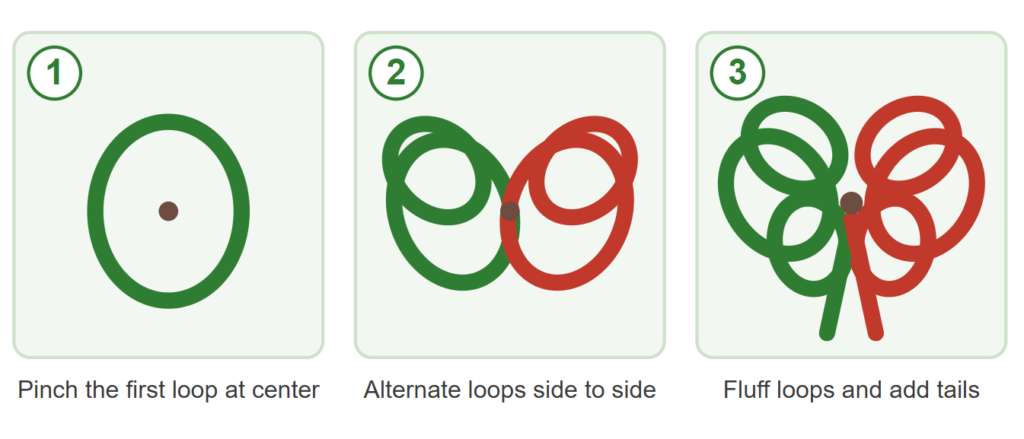
Christmas bows have a different job. check below some steps.
- Grab wired ribbon. This matters more than any other step here. Wired edges hold their shape instead of drooping.
- Make your first loop, about 4–5 inches, and pinch it at the center.
- Make a matching loop on the opposite side, pinched at the same center point.
- Keep alternating sides. Aim for 3 to 5 loops per side. Odd totals (5, 7, 9) tend to look more natural than even ones.
- Secure the center tightly with floral wire or a pipe cleaner, twisted a few times.
- Fluff each loop by pulling it gently outward.
- Add tails. Leave two longer pieces hanging down, then trim them at an angle.
Do not worry if your first loop looks great and your fourth looks a little off. that is normal. Your hands pick up the rhythm fast, usually by the third bow.
Example: for a 24-inch wide wreath, seven loops (four on one side, three on the other) using 2-inch wired ribbon usually fills the space nicely without looking overstuffed. For a smaller 12-inch wreath, drop down to five loops total using 1.5-inch ribbon.
5 Bow Styles Compared (And When to Use Each)
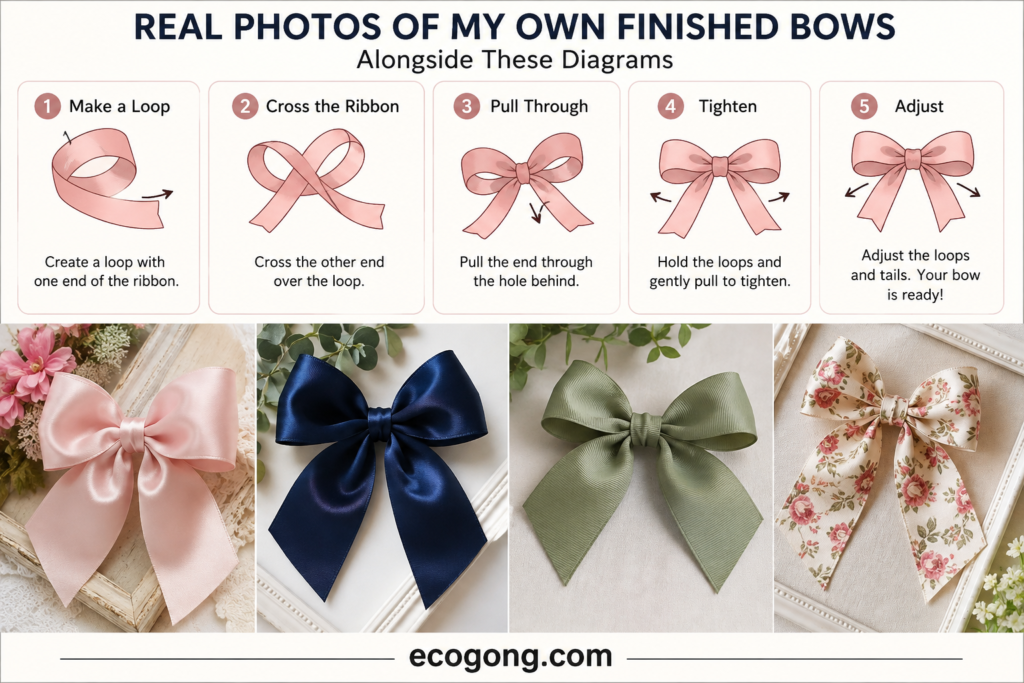
Many articles show you one bow and call it done. But there are several distinct styles and picking the right one changes the whole look. here is each one with real steps.
1. Regular Tail-Down Bow
The classic gift topper. Two loops, tails hanging down.
- Make one loop, then a matching one on the other side.
- Cross the loops and tie them at the center, using the basic bow method above.
- Adjust the loops and let the tails fall naturally.
Best for: everyday gifts and simple, clean wrapping.
2. Double Bow
A bow within a bow. It looks layered without much extra work.
- Wrap the ribbon around two fingers, looping the tail around twice.
- Push the tail end through the gap between your fingers.
- Use that loop to pull the tail through again, from underneath.
- Tighten both ends evenly.
Best for: gift baskets or boxes that need a bit more visual weight.
3. Loopy Fancy Bow
The near style to what a florist would make. Lots of small loops, fanned out.
- Start with a loop over two fingers.
- Twist the ribbon once. Hold the twist between your thumb and forefinger.
- Make another loop, then twist again, always on the same side.
- Repeat that loop-twist pattern as many times as you like. Six to ten loops is typical.
- Make your final loop bigger than the rest, then trim it to form the tails.
- Tie off the center tightly with a short scrap of ribbon or string.
Best for: flower arrangements, wreaths, and statement gift toppers.
4. Dior Bow
A flat, layered bow with a structured, modern look.
- Fold the ribbon back and forth on itself, like an accordion, stacking each fold on the last.
- Make each layer a bit smaller than the one below, so the stack tapers.
- Pinch the stack at the center and tie it off with a separate small piece of ribbon.
Best for: boutique-style wrapping or a minimalist, high end look.
5. Tulle Pom-Pom Bow
Not a traditional tied bow. You build this one instead of knotting it.
- Cut two cardboard circles with a small hole in the center of each. Stack them together.
- Wrap strips of tulle through the holes and around the edge, again and again, until the cardboard disappears.
- Tie a piece of tulle tightly around the center hole before you remove the cardboard.
- Cut between the two cardboard layers, and slide them off and fluff the pom-pom.
Best for: party decor, gift bag toppers, and baby showers.
Quick Decision Guide
| If you want… | Use this style |
|---|---|
| A fast, clean everyday bow | Regular Tail-Down Bow |
| More visual weight without extra loops | Double Bow |
| A full, fanned-out florist look | Loopy Fancy Bow |
| A flat, modern, boutique look | Dior Bow |
| A soft, round decorative accent | Tulle Pom-Pom Bow |
| Maximum volume for wreaths or decor | Wired Loop Christmas Bow (above) |
How to Tie a Ribbon Bow on a Dress or Sash (Fast, Repeatable Method)
Many guides skip this one, but it is real need. Flower girl dresses, bridesmaid sashes, costumes, these often need retying several times in one day, and especially with kids involved.
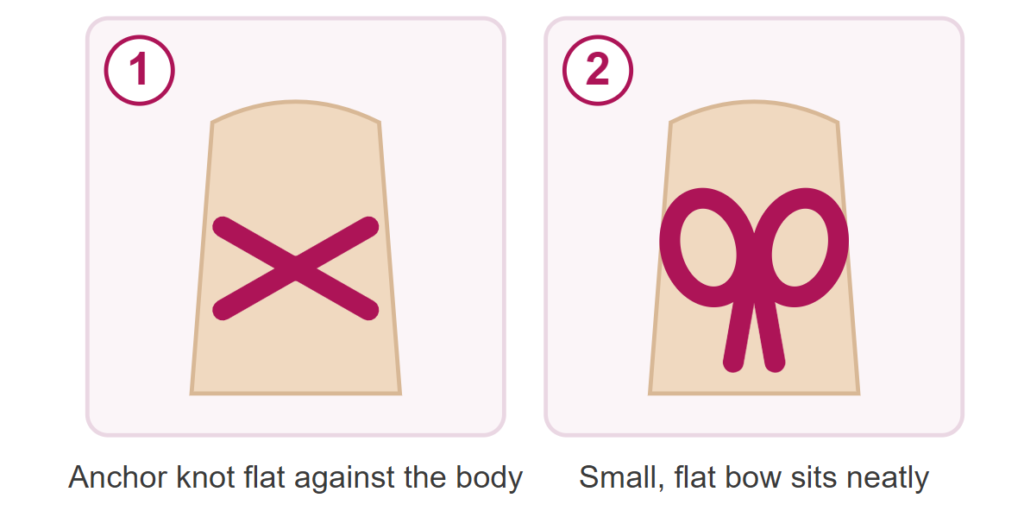
This job is different from a gift bow. You need a bow that:
- Ties fast, and even under pressure (weddings not wait around)
- Sits flat against the body instead of sticking straight out
- A helper can retie easily, often from behind
Steps:
- Line up the sash so both ends meet at the center back, with even lengths on each side.
- Cross the ribbon into an X, keeping it flat against the fabric.
- Tie one snug overhand knot close to the body first. This anchors the sash before you shape the bow.
- Form the loops with the basic slip-knot method, but keep them smaller and flatter than a gift bow. Big poufy loops look bulky on a body.
- Tighten evenly, then smooth the tails flat.
If you all be retying this more than once, practice the motion beforehand. That snug anchor knot in step 3 is what keeps the sash from sliding sideways between retying.
Best ribbon for this job: satin, about 1 to 1.5 inches wide. It sits flat against fabric and not scratch skin the way wired ribbon can.
Example: for a flower girl dress with a back sash, a 1-inch satin ribbon with a flat 4-inch bow holds up well through a whole wedding day, even with a few retying. Anything wider tends to look bulky on a small child.
Ribbon Type Comparison Table
Not all ribbon behaves the same way. check below how the common types compare.
| Ribbon Type | Holds Shape | Best For | Beginner Friendly? |
|---|---|---|---|
| Satin | Low | Everyday gifts, simple bows | Yes |
| Grosgrain | Medium | Crafts, hair bows, gift bows | Yes |
| Wired | High | Christmas bows, wreaths, centerpieces | Somewhat |
| Organza | Low | Weddings, delicate favors | Somewhat |
| Burlap | Medium | Rustic and farmhouse decor | Yes |
| Curling ribbon | Very low | Balloon ties, not structured bows | No |
Troubleshooting: Why Your Bow Not Working
Many tutorials skip this part. Honestly, it might be more useful than the steps check below.
My bow keeps coming undone. You either not tie the center tightly enough or you used a very slippery ribbon (like satin on smooth surfaces). Make sure the anchor knot is properly tightened or use grosgrain ribbon, which holds better than other types of ribbons.
My bow does not look neat. One of the loops was larger than the other before being tightened. Take care to check the size of the loops before finishing off the bow.
My Christmas bow looks flat. You may be using ribbon without wires inside it. Normal ribbon will collapse under its own weight when a few loops are stacked without the help of wires.
The ribbon does not lie straight. You may have changed your hands during the process. Don’t switch hands when tying the bow.
My bow has already fallen apart. The center was not secured properly. For wreaths and decoration where the bow needs to stay for a long time, instead of using ribbon to tie it, use wires or a pipe-cleaner.
Cost Comparison: DIY Bows vs. Store-Bought
Tying your own bows not just about looks. It also saves real money once you are wrapping more than a couple of gifts.
A 50-yard spool of wired ribbon usually costs $6 to $8. that is about 150 feet of ribbon. A single medium gift bow, base wrap plus bow also uses roughly 10 to 14 feet. So one spool covers around 10 to 12 gifts.
| Method | Cost per Gift (approx.) | Cost for 10 Gifts |
|---|---|---|
| Pre-made store bow | $2.00–$4.00 | $20–$40 |
| DIY bow (bulk ribbon spool) | $0.60–$0.80 | $6–$8 |
| DIY bow (small craft-store roll) | $1.00–$1.50 | $10–$15 |
The significant savings come from buying ribbon by the spool rather than by the small cut pieces. It allows you to save almost 50 percent on gift ribbon compared to the small rolls and up to 80 percent in comparison to pre-made bows.
How to Save and Reuse a Ribbon Bow
A well tied bow not have to be one and done. Here check how to keep it in shape for next time.
- Skip pulling the tails to remove it. Slide the loops off the box instead, or open the knot gently from the center.
- Reshape it right away if handling flattened the loops. Wired ribbon springs back easily; unwired ribbon needs a gentler touch.
- Store it flat, in a drawer or shallow box, away from anything that might crush it.
- Start a small “bow drawer.” If you wrap a lot of gifts, a few saved bows mean you’re never scrambling for a last-minute one.
Wired bows hold up to reuse much better than plain satin, since the wire keeps the loop shape even after repeated handling.
Pros and Cons of Each Bow Style
Basic Slip-Knot Bow
Pros: fast, and friendly, easy to loosen and retie, works with almost any ribbon.
Cons: not look full, can slip loose on slick ribbon.
Wired Loop Bow (Christmas Style)
Pros: full, professional look, holds shape for weeks, fully customizable size.
Cons: takes practice, needs wired ribbon (costs more), overkill for small gifts.
Common Mistakes to Avoid
- Cutting the ribbon too short. Use the length formula above check.
- Pulling tight before checking loop size. Slow down here.
- Using satin for a big Christmas bow. It not hold the shape, no matter how carefully you tie it.
- Cutting the ends flat. Angled cuts look cleaner and fray slower.
- Skipping a center anchor on decorative bows. Wire or a pipe cleaner at the center is what makes a bow last.
- Switching hands mid-motion. This causes most twisted, uneven bows.
Expert Tips From Real Practice
Touch the satin ribbon with your fingers before tying. It becomes more flexible and maintains its shape better.
Use steam to smooth out the ribbon. Hold it near the steam of a boiling kettle for a few moments. Do not let the steam come near your fingers.
Make a curl in the ribbon’s ends. Using scissors, slide the blade along the ribbon but facing away from you. This is a florist’s trick that gives ribbons the right look.
Save your best bows. Instead of separating the bows by pulling their tails, slide bows away from the box, and store flat.
Have floral wire. This will make all the difference between the bow that will last an hour and one that will last for the whole holidays.
Frequently Asked Questions
how to tie a bow with ribbon step by step? Cross the ribbon into an X, fold one end into a loop, wrap the other end around it, push a small loop through the center gap, and pull both sides tight at the same time. It is the same motion as tying a shoelace.
How much ribbon do I need for a bow? For a simple gift bow, plan on 20 to 48 inches, depending on box size. For a full Christmas bow, go with 5 to 8 feet. Or use the formula: (box width × 2) + (bow size × 6) + 12 inches for tails.
What is the easy way to tie a bow? The basic slip knot method. One loop, one wrap, one pull-through. No wire or extra tools needed.
How do you make a fluffy Christmas bow? Use wired ribbon. Make 3 to 5 loops per side, and alternating sides as you go. Secure the center tightly with floral wire then fluff each loop outward for volume.
Why does my bow keep coming loose? many time the center knot is not tight enough, or the ribbon is too slippery. Try a firmer anchor knot, or switch to grosgrain ribbon, which grips better than satin.
Can you tie a full bow without wired ribbon? You can, but it not hold big, structured loops well.
What ribbon width works best for beginners? Somewhere between 5/8 inch and 1.5 inches. Very thin ribbon is fiddly and very wide ribbon is harder to control until you get the hang of the motion.
Can I reuse a ribbon bow? Yes.
Final Words
Tying a how to tie a bow with ribbon are comes down to three things like cutting the right length, and picking the right ribbon and keeping your tension even. Get those right, and the actual tying takes about thirty seconds.
Begin by making a slip knot bow from a piece of scrap ribbon. Once you feel comfortable, practice making Christmas bows and centerpieces using the wired loop technique. Two or three attempts are all you need to get the hang of bow making.