


Quick Answer
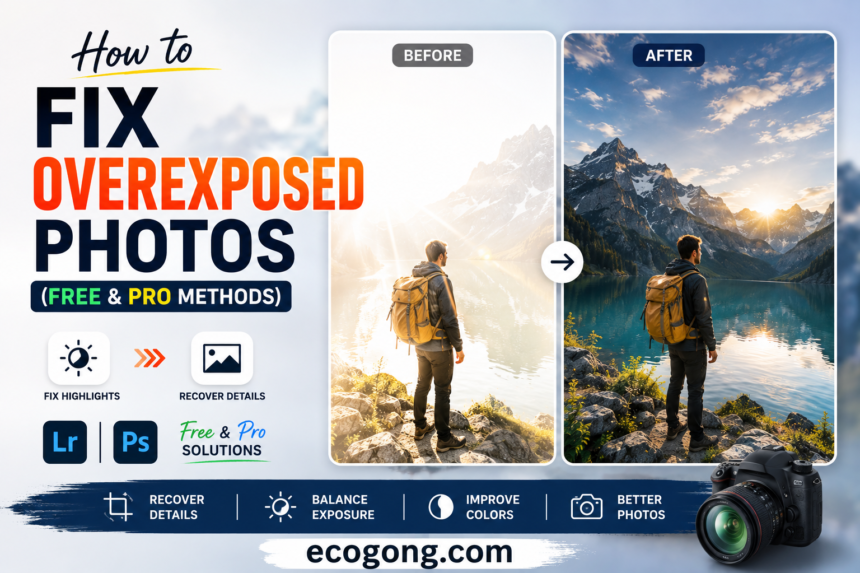
Now, Pull down the Highlights and Whites sliders in your editing app. you need real fix, not just lowering overall exposure. On iPhone, use Exposure and Highlights in the Photos app. and In Lightroom or Photoshop, use Highlights, Whites, and your histogram to guide you. One main catch though: if an area has turned pure white with no texture left, you probably not get it back. No app can.
How to Fix Overexposed Photos (Free & Pro Methods)
What Overexposed Actually Means
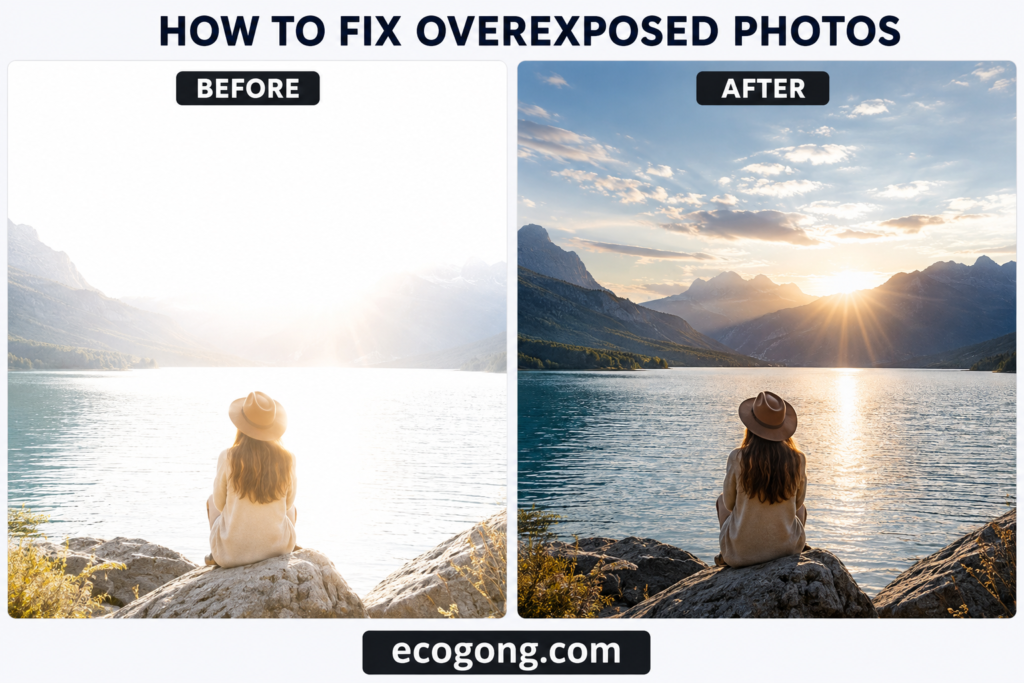
Now main point is more vacation photos than like to admit. Bright beach, sunny sky, phone camera and suddenly the whole sky is just gone. White. Flat. this call overexposure.
In simple means, overexposure means too much light hit your camera sensor. The photo comes out too bright and washed out, or pale in places.
And Skies go pure white instead of blue. Faces lose their shape. Skin looks flat, almost like paper.
Here you check something most articles do not tell you: overexposure not just one thing. Sometimes it is mild, and the whole photo just needs a touch less brightness. Other times, one area (like the sky) is completely blown out while the rest looks fine. Those two problems need different fixes, so now helps to know which one you are dealing with before you touch a single slider.
The Honest Truth: What You Can and Can’t Fix
We are one thing to say this main thing like, because I’ve wasted time in the past trying to “fix” a photo that was never fixable.
If part of your photo turns pure white with no texture and no hint of color, there is nothing left there to recover. Your editing software not create detail out of thin air. It can only bring back what the camera actually captured.
Think of it like a page left out in the sun until the ink completely fades. You can adjust the lighting, squint, zoom in not matter. The words are gone.
Now for good news. Most overexposed photos are not a total loss. Usually is still some faint detail hiding in the brightest parts. You just not see it until you pull the highlights down in your editor.
Here check a quick trick I use: zoom into the bright spot before you even start editing. also you Can see any texture, faint clouds or slight shifts in color? Good — that is fixable. Is it just flat, dead white? That one’s gone.
One thing best knowing: RAW files usually hold about one to two extra stops of recoverable highlight detail compared to JPEGs. Why? Because RAW stores way more brightness information per pixel before your camera squashes the file down into a JPEG. So if you shot in RAW, you are in best shape. If it was JPEG, you are working with less room to fix things.
How to Read a Histogram (So You Stop Guessing)
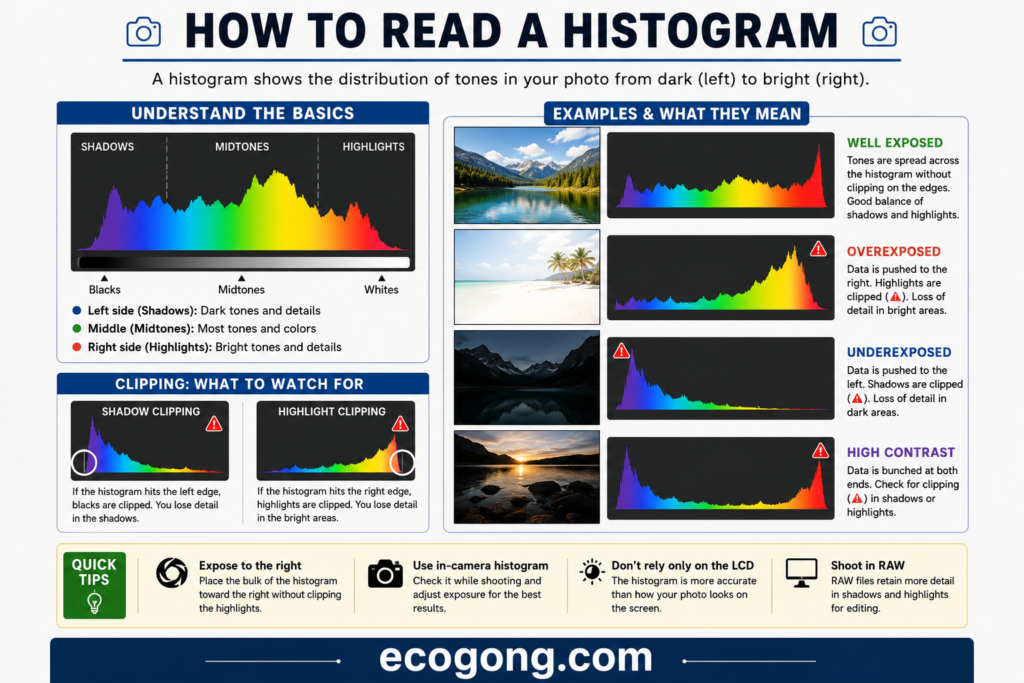
Now. many editing apps show a little mountain shaped graph somewhere on the screen. That is the histogram. A lot of people just skip right past it. Do not.
The histogram shows where your brightness sits, and from pure black on the left to pure white on the right.
Two best things to look for:
- A tall spike jammed right up against the far right edge. That called blown out highlights with no data behind them. No slider is going to fix that.
- A slope that fades out before hitting the edge. That means are still detail there. You can bring it back.
While you are pulling the Highlights slider down, keep glancing at the histogram. If you see that spike pulling away from the right wall, that is real detail coming back, not just wishful thinking.
Now, this one habit alone will save you more guesswork than any tutorial about sliders.
How to Fix Overexposed Photos on iPhone
Many people finding this are just trying to save a photo they took on their phone. check below steps by steps.
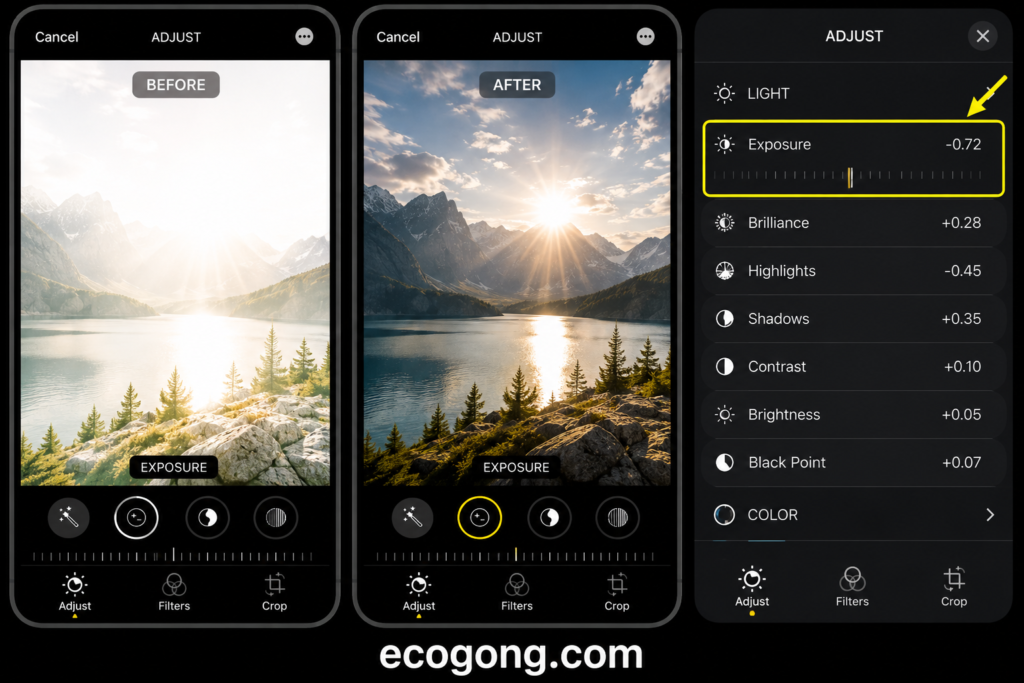
- Open the photo, and then tap Edit in the top right corner.
- Tap the Adjustments icon go to looks like three small sliders.
- Lower Exposure a little bit first. so adjusts overall brightness.
- Now pull Highlights down. This is the important step. It only affects the blown out parts, also not the whole photo.
- Nudge Brilliance down slightly, and then bump Contrast up a touch. This brings some life back into is now probably looking a bit flat and gray.
Here is tip most people never find on this: you can lower exposure before you even take the picture. Tap the screen to focus. A little sun icon shows up next to the yellow box. Swipe down on it and also your exposure drops right there in the viewfinder.
Now, we are do this every single time I shoot at the beach or in snow now. Takes two seconds and it stops the whole problem before it happens. Honestly, it is saved me more editing time than any app ever has.
How to Fix Overexposed Photos in Lightroom
Now, you check steps for How to Fix Overexposed Photos in Lightroom check below.
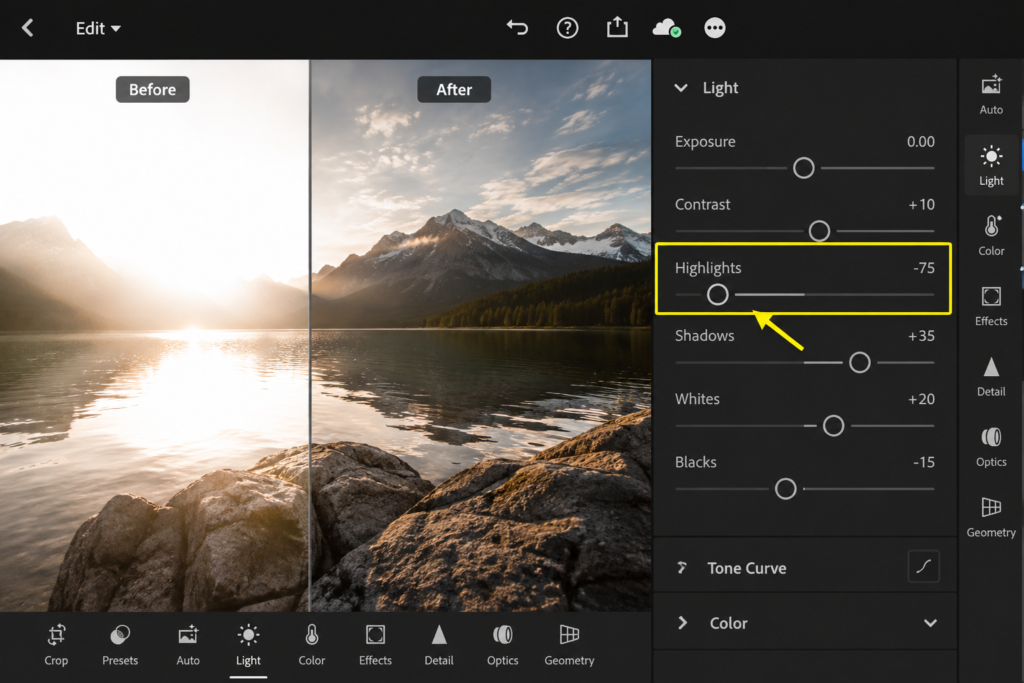
- Open the photo in the Develop module.
- Drag Highlights down — somewhere between -50 and -100, depending on how bad it is.
- Pull Whites down next. This one targets just the very brightest pixels. Keep an eye on the histogram and stop once that spike on the right disappears.
- Only touch overall Exposure if the entire photo looks too bright, and not just one part. Otherwise you al end up darkening areas that were already fine.
- Got a blown-out sky? Use the Linear Gradient tool. Drag it over just the sky, then lower exposure and highlights only in that spot. Way more precise than adjusting the whole image at once.
How to Fix Overexposed Photos in Photoshop
Photoshop is your best and good bet when a photo needs real, targeted repair, and not just a quick slider drag.
Fastest way — Camera Raw Filter:
- Go to Filter > Camera Raw Filter.
- Lower Highlights and Whites in the Basic panel.
- Adjust Exposure a bit if you still need to.
- Click OK.
For more control — Curves adjustment layer:
- Go to Layer > New Adjustment Layer > Curves.
- Click the top-right point on the line and drag it down.
- Add a point in the middle and nudge it down slightly too, just to keep things balanced.
This gives you way more precise control over exactly which brightness range comes back, than one blanket fix across the whole photo.
For the really tough cases — blending two exposures: Got two shots of the same scene, one overexposed and one that came out fine? You can combine them.
- Stack both as layers, one on top of the other.
- Add a layer mask to the top (overexposed) layer.
- Paint black over the blown-out spot to reveal the properly exposed layer underneath.
This is a real and best technique. Wedding and landscape photographers use it a lot, especially when a scene has a bright sky and a much darker foreground in the same frame. No single shot can hold both.
How to Fix Overexposed Photos Online (No Photoshop Needed)
You really not need to buy anything to fix a washed out photo. A handful of free, browser-based tools handle this well — and some get surprisingly close to what Lightroom can do.
Check below what I’d actually recommend, based on what each one is good for.
1. Photopea (Best Free Option)
Photopea runs right in your browser and looks almost identical to Photoshop. If you are ever used Photoshop, you feel right at home here.
- Go to Photopea.com and upload your photo.
- Head to Image > Adjustments > Curves or try the Camera Raw Filter.
- Drag the top-right point of the curve down to pull back those blown-out highlights.
- Or just use Image > Adjustments > Shadows/Highlights for a quicker, single-slider fix.
This is the one i pick if the photo actually needs real correction, not just a quick brightness nudge. It even supports layers so you can mask off just the part that needs fixing instead of editing the whole photo at once.
2. Fotor (Best for Speed)
Now you just want something fixed fast, without fiddling around, Fotor works well.
- Upload your photo to Fotor editor.
- Open the Adjust panel.
- Lower Highlights and Exposure together.
- Hit Auto Enhance first, then tweak by hand if it’s not quite right.
This comes to built for casual use. It not match Photoshop precision, but it gets a decent result in under two minutes, which is honestly all most people need.
3. Pixlr (Best Middle Ground)
Pixlr sits comfortably between Fotor simplicity and Photopea depth.
- Upload your photo, then open the Adjustment tools.
- Use the Highlight Recovery slider, if your version has one.
- Add a Curves adjustment on top for finer control.
- If the overexposure left weird color patches, clean them up with the Healing/Clone tool.
Pixlr also has a best mobile app, handy if you are editing on your phone without a laptop nearby.
4. Canva Photo Editor
If you are already inside Canva working on a social post, you not need to jump apps just to fix exposure.
- Upload your photo into a Canva design.
- Click on the photo, then open Edit Image > Adjust.
- Lower Highlights and Brightness together.
- Bump Contrast up slightly so the photo not look too flat afterward.
Not the most powerful tool on this list, but it saves you a step if Canva is where the photo headed anyway.
5. Google Photos (Easiest Option)
A lot of people forget Google Photos actually has solid editing tools built right in, and there are good chance it is already on your phone.
- Open the photo in Google Photos and tap Edit.
- Go to the Adjust tab.
- Lower Highlights and Whites.
- Try the Pop or Suggestions feature for a fast auto-fix.
This works best and well for photos that already synced from your phone, since the app is usually just sitting there anyway.
Quick Comparison: Free Online Tools
| Tool | Best For | Highlight Recovery | Learning Curve |
|---|---|---|---|
| Photopea | Serious, detailed fixes | Excellent | Medium |
| Fotor | Fast, one-click fixes | Good | Very low |
| Pixlr | Balanced control and speed | Good | Low |
| Canva | Social media edits | Basic | Very low |
| Google Photos | Convenience, phone photos | Basic to Good | Very low |
A Few Things Worth Knowing Before You Start
- Free tools want to compress your image a little more during downloading. It works fine for Instagram but not quite fine if print needs to be done.
- Most browser tools do not edit RAW images properly, even if RAW images are uploaded. They convert it to JPEG before performing the process.
- Make a backup of the original image. Online tools do not always offer the complete history of changes made.
If you are looking for a quick solution for social media, you can use Fotor, Canva, or Google Photos. However, if image is important (for example, a picture from a wedding, or a photo you are going to print), so you use Photopea instead. that is free but also very similar to Photoshop.
Comparison: Which Method Actually Fits You
| Method | Best For | Cost | Skill Needed | Control Level |
|---|---|---|---|---|
| iPhone Photos app | Quick, casual fixes | Free | Beginner | Basic |
| Lightroom | Photographers, batch edits, RAW files | Paid subscription | Intermediate | High |
| Photoshop | Severe or complex overexposure | Paid subscription | Advanced | Very high |
| Free online tools | No-install, occasional use | Free | Beginner | Medium |
Pros and Cons of Each Tool
iPhone Photos app
- Pros: Free, fast, always with you, no learning curve.
- Cons: No layer masking, weaker RAW handling, limited precision.
Lightroom
- Pros: Strong highlight recovery, also works great with RAW files, speeds up editing lots of photos at once.
- Cons: Costs a subscription, small learning curve at the start.
Photoshop
- Pros: The most powerful option here, and lets you blend multiple exposures, gives pixel-level control.
- Cons: Steep learning curve, often overkill for a simple fix.
Free online tools
- Pros: No install, no cost, works on pretty much any device with a browser.
- Cons: Some quality loss on export, fewer advanced tools, needs a stable connection.
Mistakes That Make Overexposed Photos Worse
I have personally experienced most of these mistakes, so please take this as a list to help you learn from my errors.
- Using Exposure, and ignoring Highlights. While the Exposure slider affects the exposure in all the areas of the image, Highlights deals with only the bright areas. Mixing these sliders could cause you to darken areas you wanted to keep light.
- Editing a JPEG when the original RAW file was available. You effectively lose valuable information.
- Overdoing the editing. Using sliders too much can result in an unnatural looking photo.
- Failing to look at the histogram. You may easily end up making wild guesses about data instead of using your skills.
- Using the same approach for the whole photo with regard to the adjustment. The blown-out areas of the sky need their own fix, not simply applying the global slider.
- Editing the only available copy of the photo. Always make a copy of the file. Trust me; you do not want to learn this lesson the hard way.
How to Stop This From Happening Again
Now, you can Fixing overexposed photos works fine. But not having to fix them in the first place? That is better.
- Shoot RAW whenever your camera or phone lets you. More recoverable data, every time.
- Use exposure compensation. Dialing down -0.3 to -1.0 stops in bright light stops most blowouts before they happen.
- Check your histogram while you are shooting, also not just afterward. Most cameras, and even some phone camera apps, show it live.
- Use spot metering for backlit subjects, like someone standing in front of a window or the sun.
- Bracket tricky shots. Take three versions at different exposures, then pick the best one or blend them together later.
Here is the honest reason this matters: every fix you do after the fact costs you a little quality. Getting exposure right in the moment always beats fixing it later, so no matter how good your editing software is.
FAQs
Can you fix an overexposed photo after it is taken? Yes, Many of the time as long as some texture or color is still there in the bright areas. If it is turned pure white with nothing left, editing tools not bring back detail that was never captured.
Why not I fully fix a badly overexposed photo? Once a pixel goes pure white, there is no light or color data left behind it. No app, however good, can recover something the camera never recorded.
What is the fastest way to fix overexposed photos on iPhone? Open Edit, then lower Exposure and Highlights in the Adjustments panel. then Takes under a minute for photos that are only mildly overexposed.
Is Lightroom or Photoshop better for this? Lightroom is usually faster for everyday highlight recovery. Photoshop wins for extreme cases.
Can I fix overexposed photos for free? Yes. Photopea, Fotor, Pixlr, Canva, and Google Photos all let you fix overexposed photos online for free.
Does shooting in RAW actually make a difference? Yes, a real one.
Why does my photo look overexposed on my phone screen but seems fine everywhere else? Sometimes that is just your screen brightness playing tricks on you, not the photo itself. Check the histogram in an editing app before deciding the photo is actually blown out.
Should I fix exposure before or after other edits like color? Fix exposure first. Every color and contrast decision looks different once your exposure is right, so is the natural place to start.
Final Words
If you can one thing to remember from all this: how to fix overexposed photos so you need considered to some thing like adjust Highlights, not just Exposure. That single habit fixes most washed out photos, whether you are on your phone or deep in Photoshop.
Got a quick phone photo to save? The built in Photos app handles it just fine. Working with RAW files or a genuinely tricky scene? Lightroom and Photoshop give you the precision to actually pull it off, and blending exposures included. also if you just need something fast with no software, Photopea and Google Photos will cover almost everything you throw at them.